Swift from Zero to Expert #4: Control Flow — from if/else to pattern matching
if/else, exhaustive switch with pattern matching, guard as a philosophy, and how the compiler optimizes your decisions into jump tables.
In the previous article we discovered that Strings in Swift are much more than text — they’re collections of grapheme clusters with deep memory implications. Today we’ll explore how Swift makes decisions: control flow.
And don’t think this is boring just because every language has if and for. Swift’s switch is a completely different beast from C’s. guard is a design philosophy, not just a keyword. And the compiler turns your decisions into machine code in ways worth understanding.
Control flow is where a language shows its personality. And Swift has plenty of personality.

For-In Loops: iterating over everything
for-in is the most natural way to traverse sequences in Swift — arrays, dictionaries, ranges, strings, anything iterable (technically, any type that conforms to the Sequence protocol — more on protocols in a later article).
// Iterating an arraylet names = ["Anna", "Alex", "Brian", "Jack"]for name in names {    print("Hello, \(name)!")}
// Iterating a dictionarylet legs = ["spider": 8, "ant": 6, "cat": 4]for (animal, count) in legs {    print("\(animal)s have \(count) legs")}
// Iterating a rangefor index in 1...5 {    print("\(index) times 5 is \(index * 5)")}
If you don’t need the iteration value, use _:
let base = 3var power = 1for _ in 1...10 { power *= base}// power = 59049 (3^10)With stride you can control the iteration step:
// From 0 to 60, by 5 (not including 60)for minute in stride(from: 0, to: 60, by: 5) {    print(minute) // 0, 5, 10, 15, ... 55}
// From 3 to 0, by -1 (including 0)for countdown in stride(from: 3, through: 0, by: -1) {    print(countdown) // 3, 2, 1, 0}
While and Repeat-While
// while — evaluates the condition BEFOREvar counter = 0while counter < 5 {    print(counter)    counter += 1}
// repeat-while — evaluates the condition AFTER (like do-while in C)var attempts = 0repeat {    attempts += 1    print("Attempt \(attempts)")} while attempts < 3
repeat-while guarantees the body executes at least once. Useful for validations where you need a first attempt before checking.
If/Else: the foundation
let temperature = 35
if temperature > 30 {    print("It's really hot!")} else if temperature > 20 {    print("Nice weather")} else {    print("A bit cold")}
If as an expression (Swift 5.9+)
Since Swift 5.9, if can be used as an expression that returns a value:
let weather = if temperature > 30 { "hot"} else if temperature > 20 { "warm"} else { "cold"}// weather = "hot"This eliminates the need to declare a variable and then assign it inside each branch. It’s cleaner, more concise, and the compiler verifies that all branches return a value of the same type.
Switch: Swift’s superpower
This is where Swift really shines. The switch isn’t just “compare a value against constants” — it’s a full pattern matching engine. The official documentation describes it in Control Flow.
The basics
let character: Character = "z"switch character {case "a": print("The first letter")case "z": print("The last letter")default: print("Some other character")}Two fundamental differences from C:
- No implicit fallthrough. In C, if you forget
break, execution “falls” into the next case. In Swift, each case ends automatically. Safer by default. - Must be exhaustive. The compiler forces you to cover all possible cases, or include
default. This eliminates an entire class of bugs.
Switch as an expression
let description = switch character {case "a": "The first letter of the Latin alphabet"case "z": "The last letter of the Latin alphabet"default: "Some other character"}Interval matching
Switch can compare against ranges:
let score = 85switch score {case 0..<60: print("Fail")case 60..<70: print("D")case 70..<80: print("C")case 80..<90: print("B")case 90...100: print("A")default: print("Invalid score")}// "B"Tuples
You can match against tuples, using _ to ignore values:
let point = (1, -1)switch point {case (0, 0): print("At the origin")case (_, 0): print("On the x-axis")case (0, _): print("On the y-axis")case (-2...2, -2...2): print("Inside the box")default: print("Outside the box")}// "Inside the box"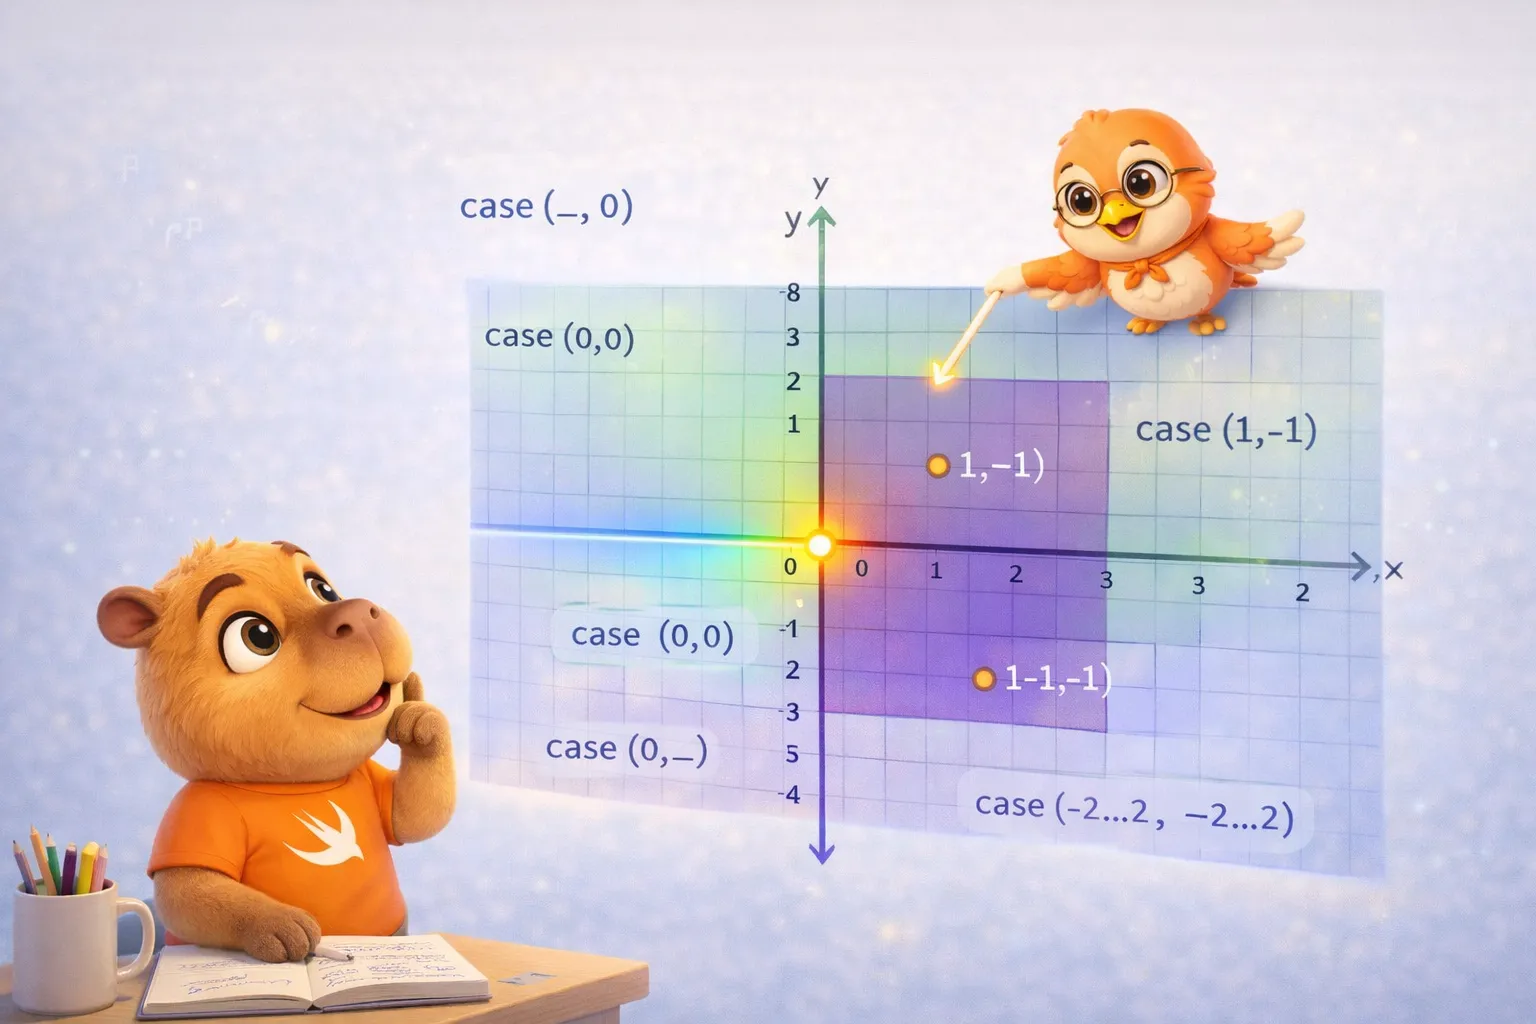
Value bindings
You can capture values within a case:
let anotherPoint = (2, 0)switch anotherPoint {case (let x, 0): print("On the x-axis with x = \(x)")case (0, let y): print("On the y-axis with y = \(y)")case let (x, y): print("At (\(x), \(y))")}// "On the x-axis with x = 2"The last case with let (x, y) captures both values and always matches — it works like a default but with access to the values.
Where clauses
Add extra conditions to a case:
let point3D = (1, -1, 0)switch point3D {case let (x, y, _) where x == y: print("On the line x == y")case let (x, y, _) where x == -y: print("On the line x == -y")case let (x, y, z): print("Arbitrary point (\(x), \(y), \(z))")}// "On the line x == -y"Compound cases
Multiple patterns in a single case:
let letter: Character = "e"switch letter {case "a", "e", "i", "o", "u": print("\(letter) is a vowel")case "b", "c", "d", "f", "g", "h", "j", "k", "l", "m", "n", "p", "q", "r", "s", "t", "v", "w", "x", "y", "z": print("\(letter) is a consonant")default: print("Not a letter")}Guard: the early exit philosophy
guard is one of Swift’s most underrated features. Its purpose is to validate conditions at the beginning of a scope and exit early if they’re not met:
func processOrder(item: String?, quantity: Int) {    guard let item = item else {        print("No item provided")        return    }
    guard quantity > 0 else {        print("Invalid quantity")        return    }
    // Here we know for certain that item exists and quantity > 0    print("Processing \(quantity)x \(item)")}
The key difference from if:
// With if — nesting hellfunc processWithIf(item: String?, quantity: Int) {    if let item = item {        if quantity > 0 {            // Actual code buried in indentation            print("Processing \(quantity)x \(item)")        } else {            print("Invalid quantity")        }    } else {        print("No item provided")    }}
// With guard — linear flowfunc processWithGuard(item: String?, quantity: Int) {    guard let item = item else { return }    guard quantity > 0 else { return }
    // Actual code at the main indentation level — clean    print("Processing \(quantity)x \(item)")}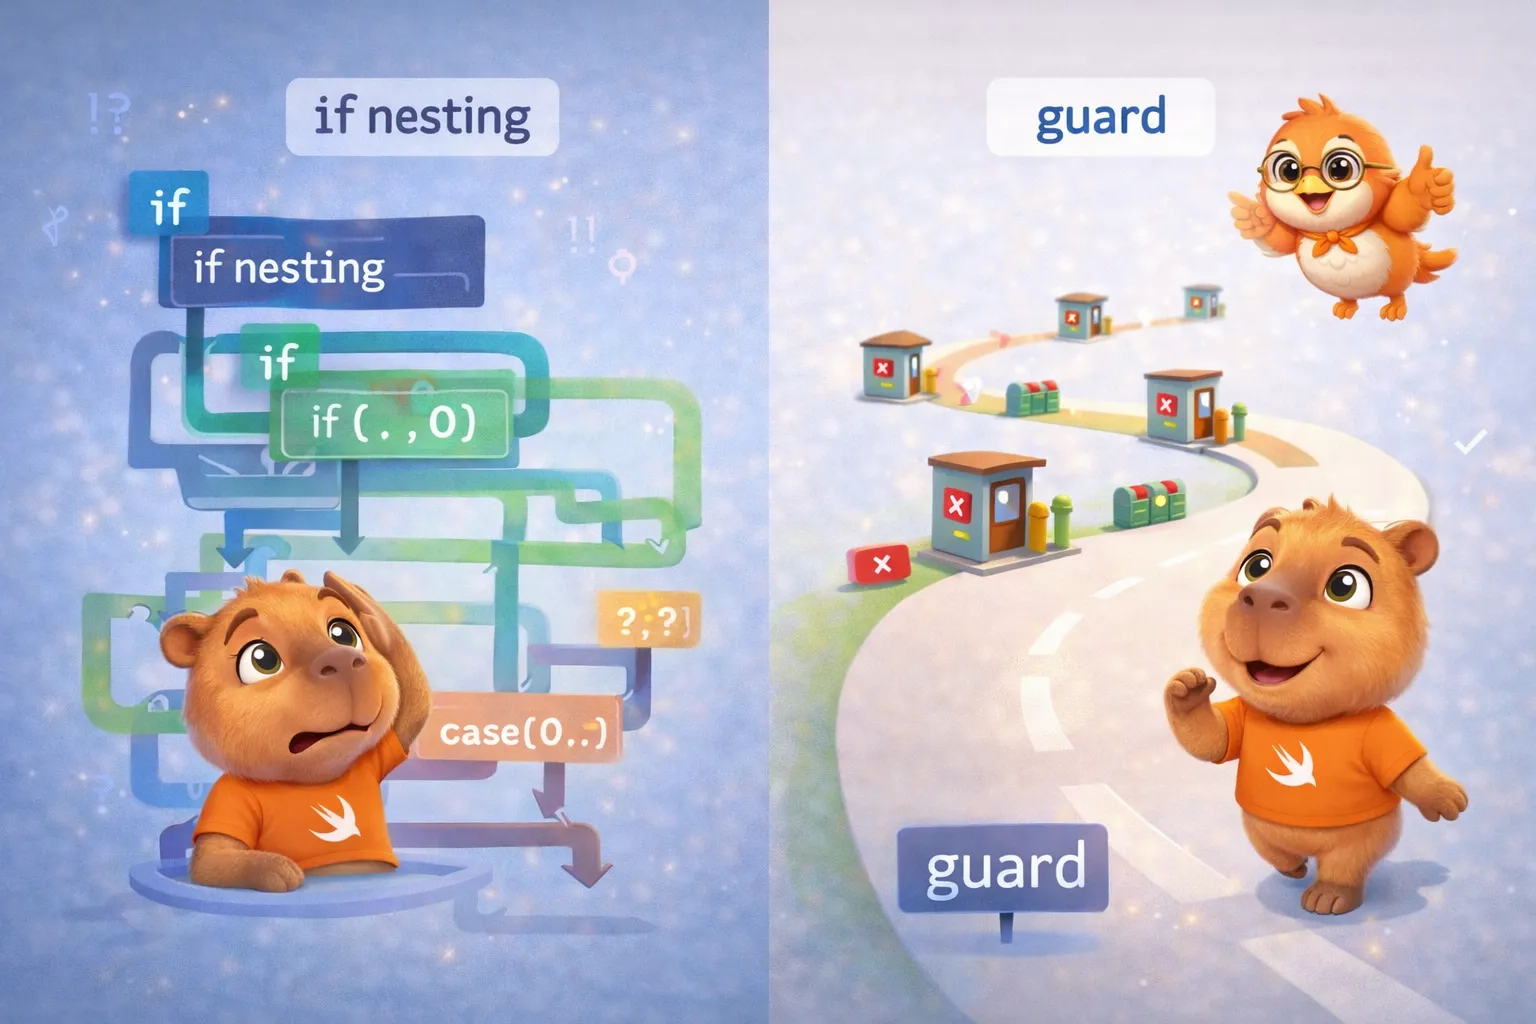
Guard isn’t just syntactic sugar — it’s a philosophy: validate your preconditions, exit early if they fail, and keep the happy path at the main indentation level.
Defer: execute code on exit
defer guarantees that a block of code runs when the current scope ends, no matter how:
func readFile(at path: String) throws -> String {    let file = open(path)    defer {        close(file) // Runs when leaving the function, no matter what    }
    guard let content = try? read(file) else {        return "" // defer closes the file    }
return content // defer closes the file}(throws and try? are Swift’s error-handling syntax — covered in a later article; focus here on how defer runs on every exit path.)
Multiple defers execute in reverse order (LIFO):
func example() { defer { print("First defer") } defer { print("Second defer") } defer { print("Third defer") } print("Function body")}// Function body// Third defer// Second defer// First defer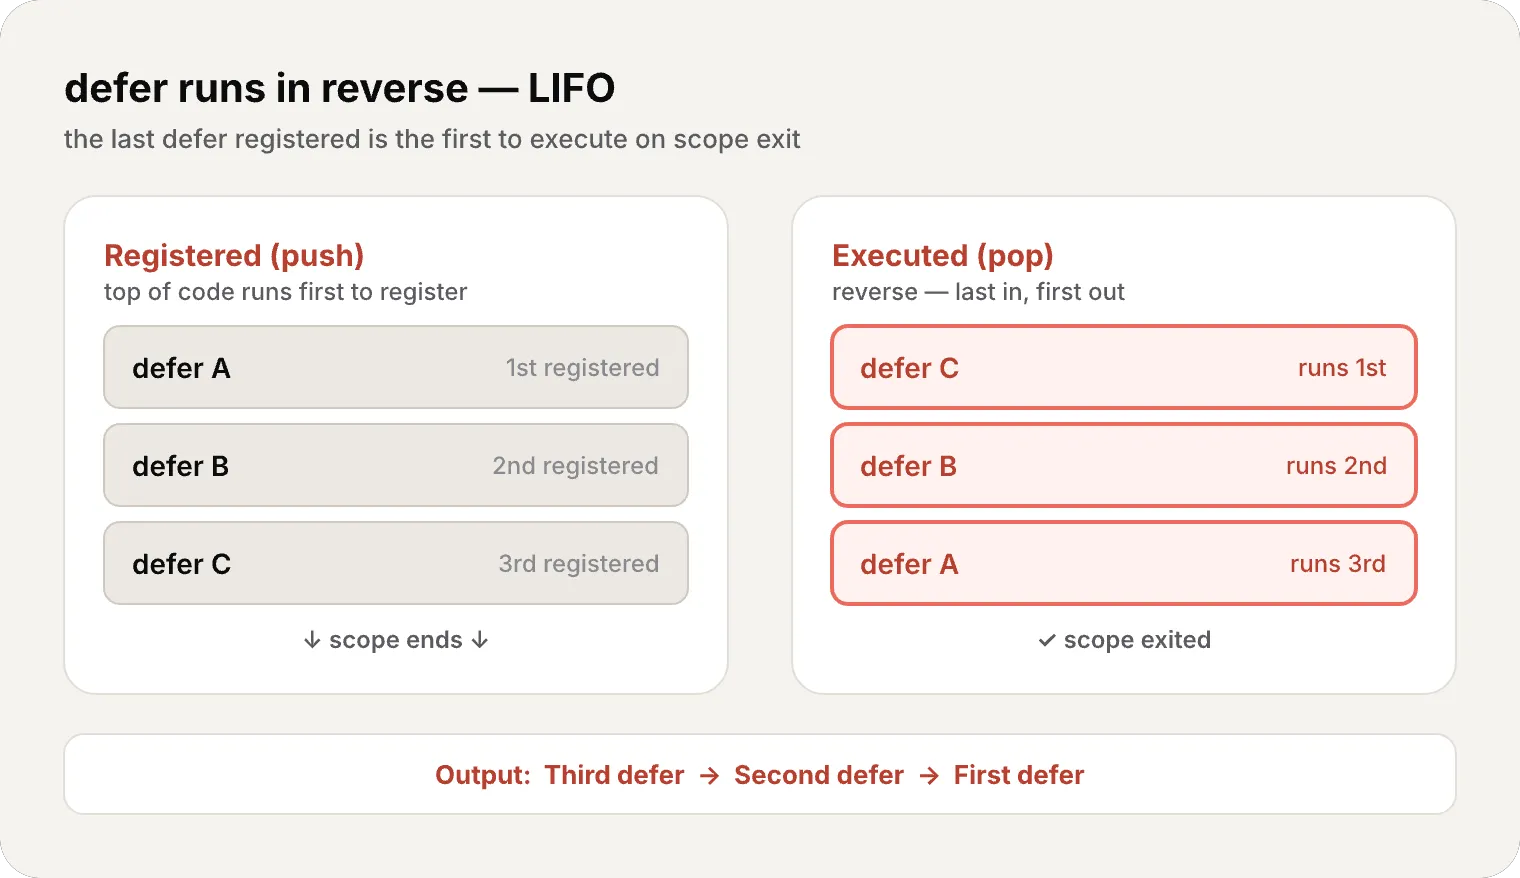
Control Transfer: break, continue, fallthrough
// continue — skip to the next iterationfor number in 1...10 {    if number % 2 == 0 { continue }    print(number) // Only odds: 1, 3, 5, 7, 9}
// break — exit the loopfor number in 1...100 {    if number > 5 { break }    print(number) // 1, 2, 3, 4, 5}
// fallthrough — force falling into the next case (rarely used)let value = 5switch value {case 5:    print("Five")    fallthroughcase 6:    print("Five or six")default:    break}// "Five"// "Five or six"
Labeled Statements
When you have nested loops, you can label a loop to break or continue on it specifically:
let matrix = [[1, 2, 3], [4, 5, 6], [7, 8, 9]]
outerLoop: for row in matrix {    for value in row {        if value == 5 {            print("Found 5!")            break outerLoop // Exits BOTH loops        }    }}
Checking API Availability
Swift has a built-in way to check API availability:
if #available(iOS 17, macOS 14, *) {    // Code that uses iOS 17+ APIs} else {    // Fallback for older versions}
// With guardguard #available(iOS 17, *) else {    return}// Code that uses iOS 17+ APIs
The compiler and control flow
Let’s talk about what happens under the hood — the memory and compiler thread of this series.
Switch and jump tables — what is a jump table?
When you write a switch with if/else, the processor has to evaluate each condition one by one. “Is it 200? No. Is it 301? No. Is it 404? Yes.” That’s O(n) — with 50 cases, it might need 50 comparisons.
A jump table is an elegant compiler trick. Instead of comparing, it creates an array of memory addresses at compile time. Each position in the array corresponds to a case, and its value is the address of the code that should execute.
Here’s how it works:
- The compiler creates an internal array:
table[200] = address_handleSuccess, table[301] = address_handleRedirect, ... - At runtime, when
statusCode = 404arrives, the processor simply doestable[404]— a direct index access - The processor jumps to that memory address without evaluating any conditions
- Result: O(1) regardless of how many cases there are
It’s like the difference between searching for a name in a list (you check one by one) vs looking it up in an indexed dictionary (you go straight to the letter).
// The compiler can optimize this into a jump tableswitch statusCode {case 200: handleSuccess()case 301: handleRedirect()case 404: handleNotFound()case 500: handleServerError()default: handleUnknown()}![Jump table versus if/else chain: the left panel checks values 0, 1, 2, 3 one by one until a match (O(n)); the right panel indexes table[3] directly to the matching slot in a single lookup (O(1))](/_astro/jump-table.Bc7dSG_m_1s9vni.webp)
Guard and variable lifetime
When you write guard let value = optional else { return }, the compiler knows that after the guard, value exists with certainty. This has direct implications:
- It can reserve stack frame space for
valueonly once - It doesn’t need to maintain nil checks after the guard
- It can optimize the stack layout knowing exactly which variables are alive at each point
Exhaustiveness at compile time
Switch exhaustiveness is a compile-time check. It generates no extra code at runtime. The compiler simply verifies that every possible value of the type is covered. If one is missing, your code doesn’t compile. If you cover them all, the result is as efficient as if you’d written a chain of if/else.
- Switch with integers/enums → Jump table O(1)
- Switch with ranges → Binary search or ordered comparisons
- Switch with where → Optimized comparison chain
- Guard → Guaranteed variable after guard, zero overhead
- Exhaustiveness → Compile-time verification, zero runtime cost
- Defer → Translated to cleanup code inserted at each exit point
Every if, guard, and switch you write is a conversation with the compiler. The more information you give it — exhaustiveness, early exit, concrete types — the better code it generates.
Recap
Today we covered all of Swift’s control flow:
- For-in — iterates arrays, dictionaries, ranges, strings, with stride for custom steps
- While / Repeat-while — conditional loops, repeat guarantees at least one execution
- If/else — classic conditionals, now also as expressions (Swift 5.9+)
- Switch — exhaustive pattern matching with interval matching, tuples, value bindings, where clauses, compound cases
- Guard — early exit as a philosophy, unwrapped variables available afterward
- Defer — guaranteed cleanup when leaving scope (LIFO)
- Control transfer — break, continue, fallthrough, labeled statements
- API availability —
#availablefor version checks - Compiler — jump tables for switch, lifetime optimization with guard, exhaustiveness at zero runtime cost
What’s next
In the next article we enter functions — first-class citizens in Swift. Parameters with labels, inout, function types, functions as values, nested functions, and why all of this is the gateway to closures. We’ll start seeing how Swift treats code as data.
See you next week.
Swift’s switch isn’t an if/else in disguise — it’s a pattern matching engine that the compiler turns into efficient machine code. When you master it, you write code that’s both more expressive and faster.
Related
-
- swift
- swift-zero-expert
- swift-fundamentals
Swift from Zero to Expert #10: Inheritance & Initialization
Subclassing, overriding, and super. Designated vs convenience initializers, two-phase initialization, failable and required init, and deinit — the full lifecycle of a class, explained in memory.
-
- swift
- swift-zero-expert
- swift-fundamentals
Swift Zero to Expert #9: Properties, methods, and subscripts
Stored vs computed properties, observers, lazy, static. How properties define the memory layout and why computed = zero storage.
-
- swift
- swift-zero-expert
- swift-fundamentals
Swift Zero to Expert #8: Structs vs Classes — the decision that shapes your app
Value semantics vs reference semantics, static vs dynamic dispatch, and why Apple recommends structs by default. The article that changes how you think about Swift.